Leads from Google Form to HubSpot or MailChimp
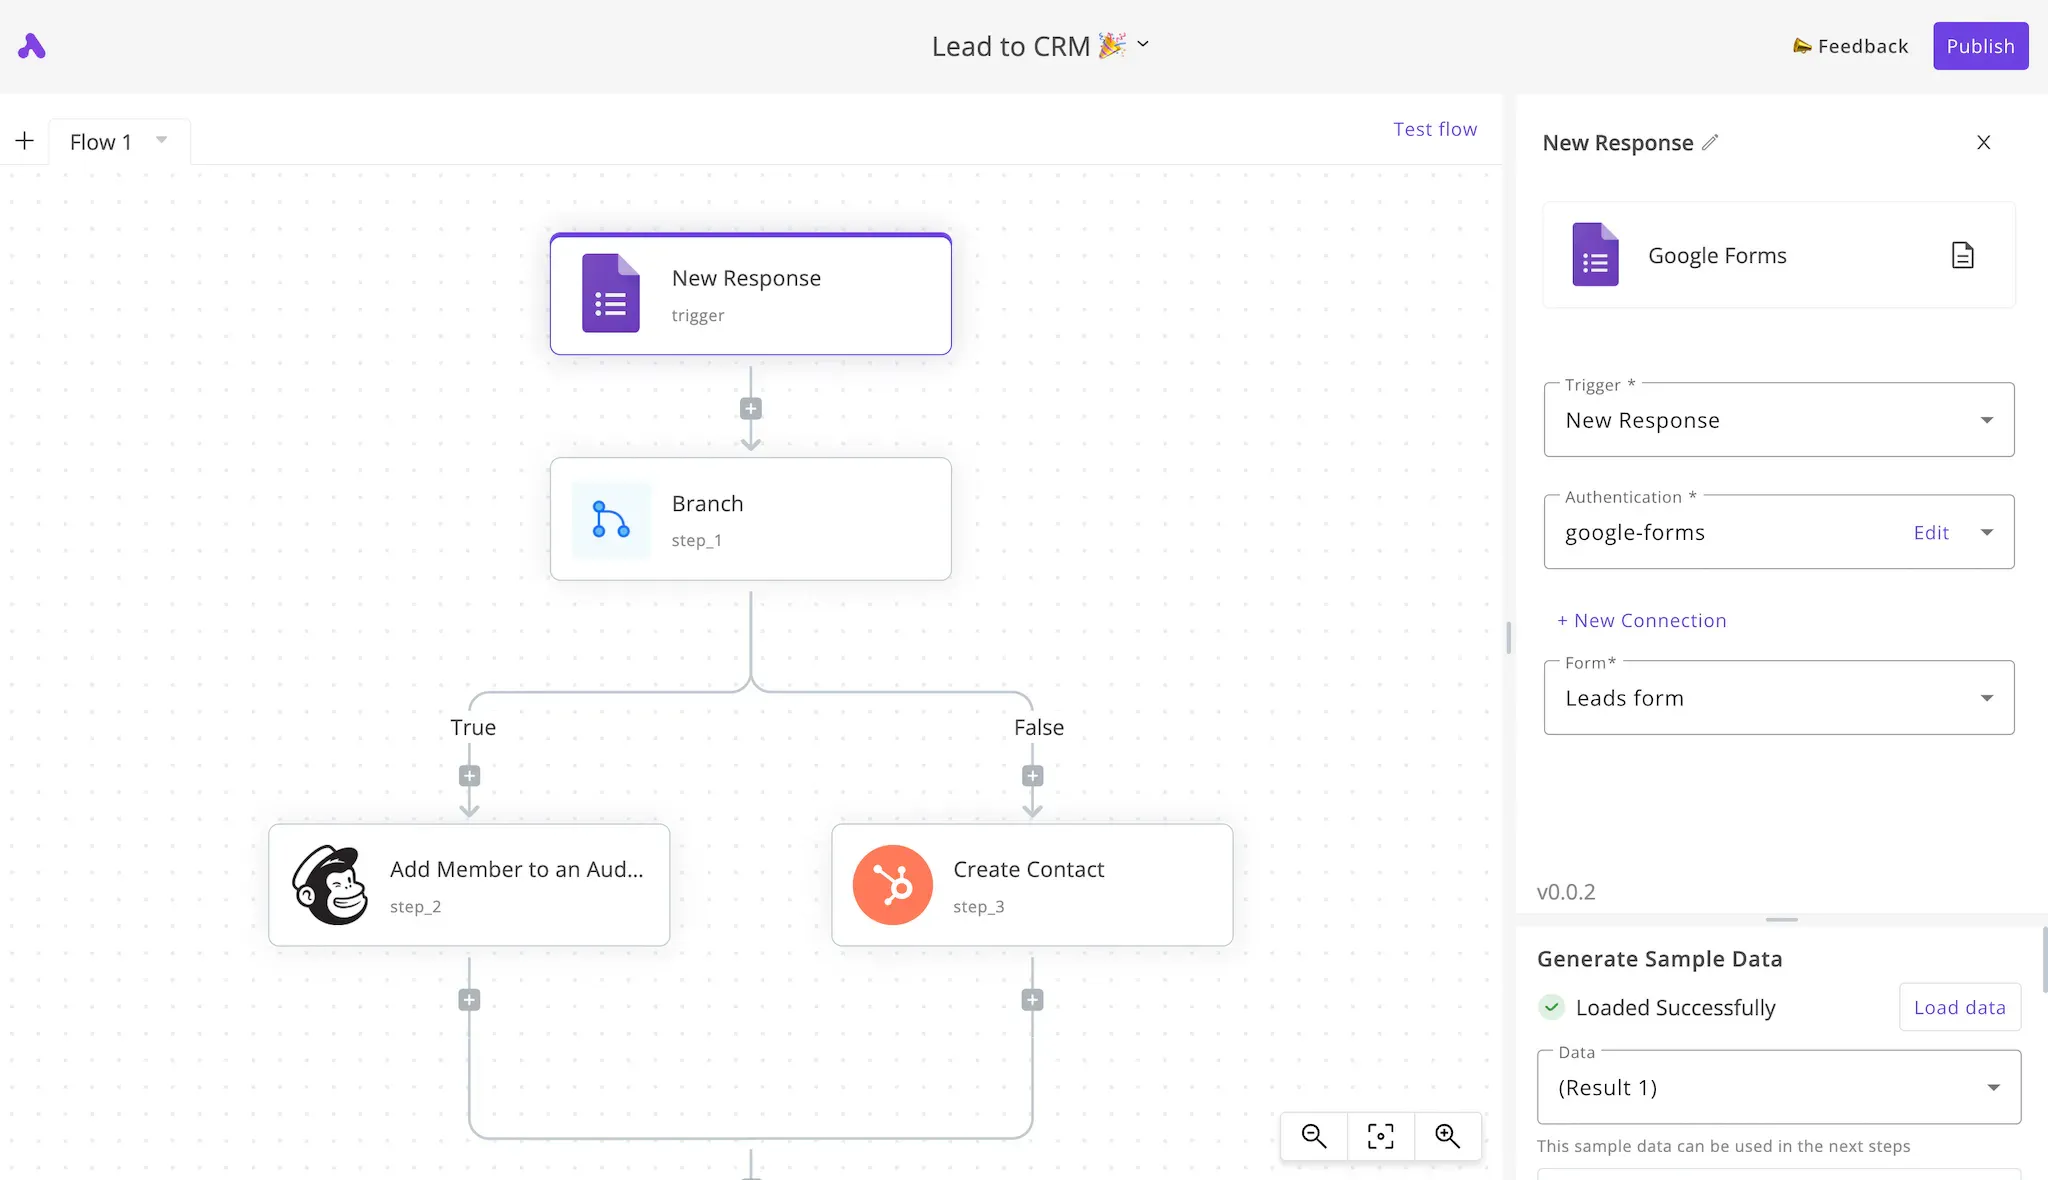
So you're collecting leads with a simple Google Form for your business and you'd like to see these leads in your HubSpot CRM. In fact, you realized that you'd like to only add the contacts who matter to your sales team to HubSpot and engage with the rest via email campaigns on the long run.
For example, if they use a Gmail address, they're not the type of leads you are targeting, then you might add them to a MailChimp audience so they keep receiving your marketing emails without wasting your sales team time. This is in part called Lead Scoring and Lead Nurturing.
Automate lead scoring and nurturing
Traditionally, if you use a Google Form to collect your leads, you'll have to receive them in a Google Sheet, read through them and copy the ones you care about to your HubSpot CRMs. Then take the remaining ones to your MailChimp account by exporting them from the sheet and importing them to MailChimp.
This is an unbelievable number of wasted hours on manual work every week. With today's automation tools, this process can be automated in under an hour and forever. This guide will take you through the steps to do so.
Steps to automate leads flow from a Google Form to HubSpot CRM and MailChimp
Whenever a lead is submitted to our Google Form, we'll automatically check if they use a Gmail address and add them to our MailChimp audience to move them to our email marketing. Otherwise, we'll add them to our HubSpot CRM to move them to our sales process.
Prerequisites
You will need to have the following tools set up to follow the guide smoothly:
- An Activepieces account: the automation tool that will connect the other ones together.
- A Google Form used to collect the leads.
- A HubSpot CRM account to receive the leads in.
- A MailChimp account and audience to add the remaining contacts to.
Let's start with this.
1. Create an Activepieces account
Your automation will live in an Activepieces account, create your account if you don't have one already to get started with this guide.
2. Create a new automation flow
Click on "Start building" if it's your automation in the Activepieces account, you'll land on the automation builder. I like to give cool names to my automations so I named this one "Lead to CRM 🎉".
3. Set up your Google Form trigger
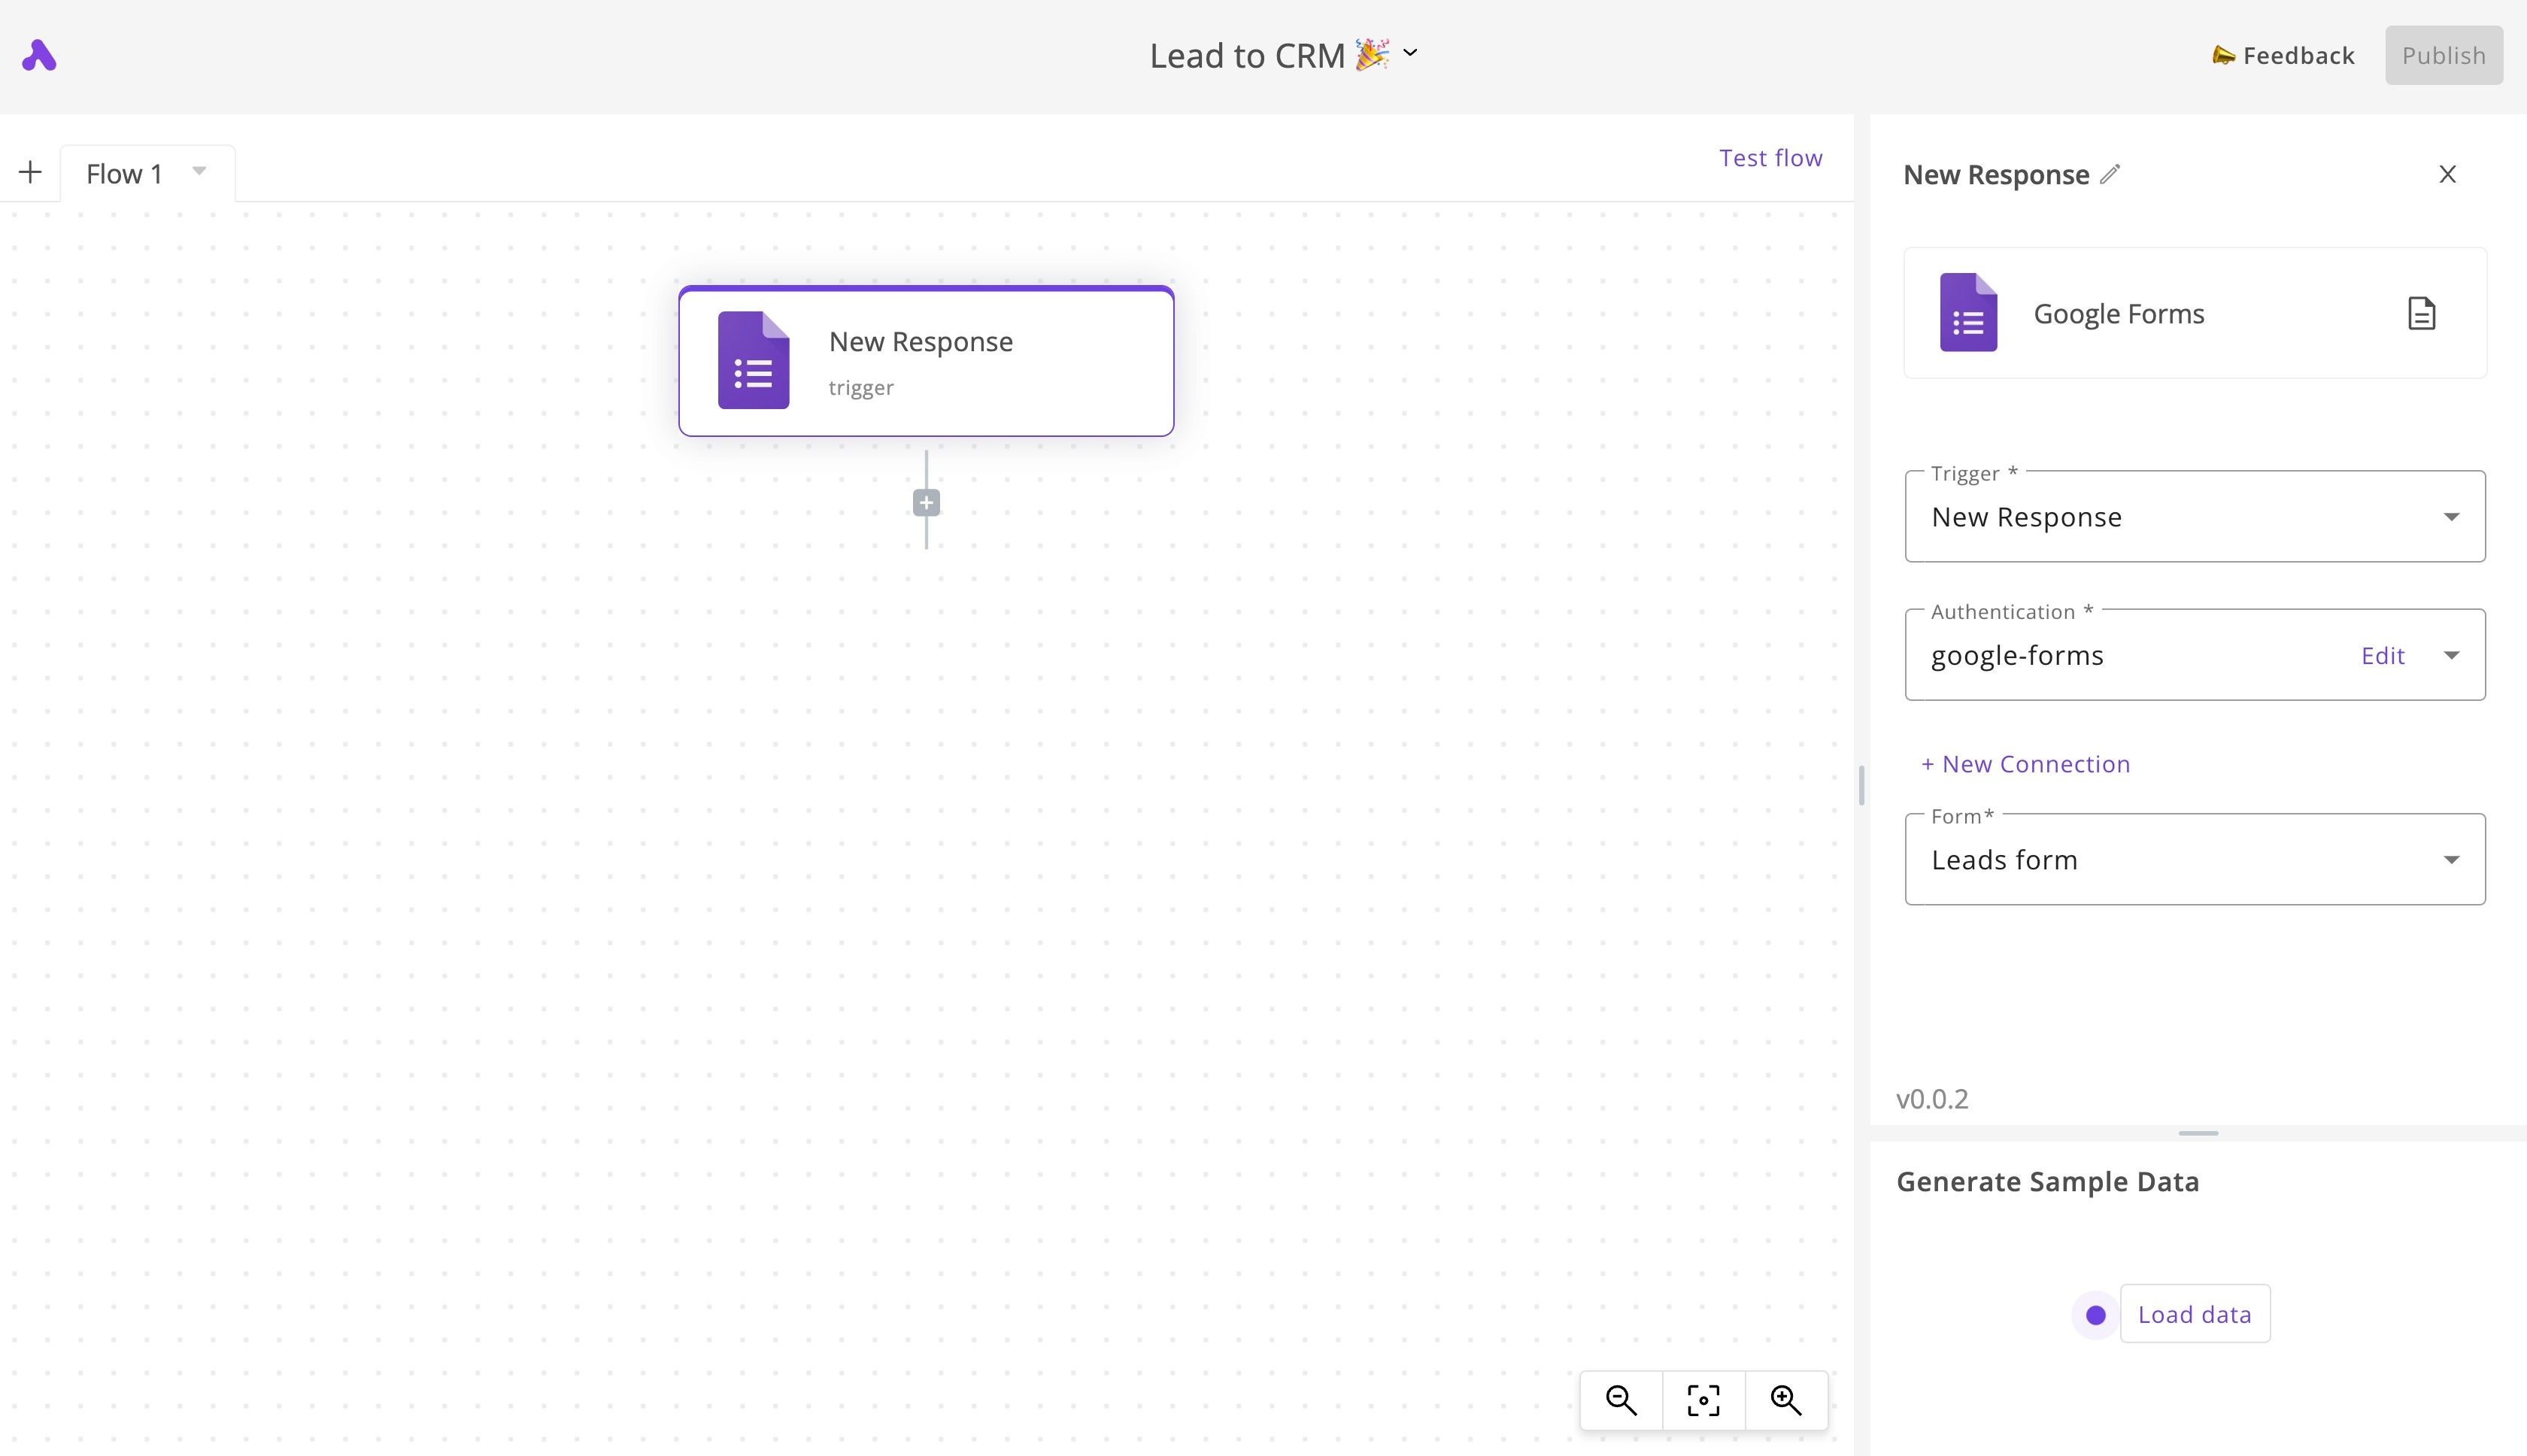
As described earlier, our automation will start from a Google Form where the lead enters their contact details. So we'll start by selecting the Google Form app for the first step of our automation, then select the "New Response" trigger. Now you have to connect your Google account using the "+ New Connection" button.
Once connected, you'll see all your Google Forms in the Form field. Select the one you'd like the automation to run for each new response in.
I set up the trigger and it eventually looked like this:
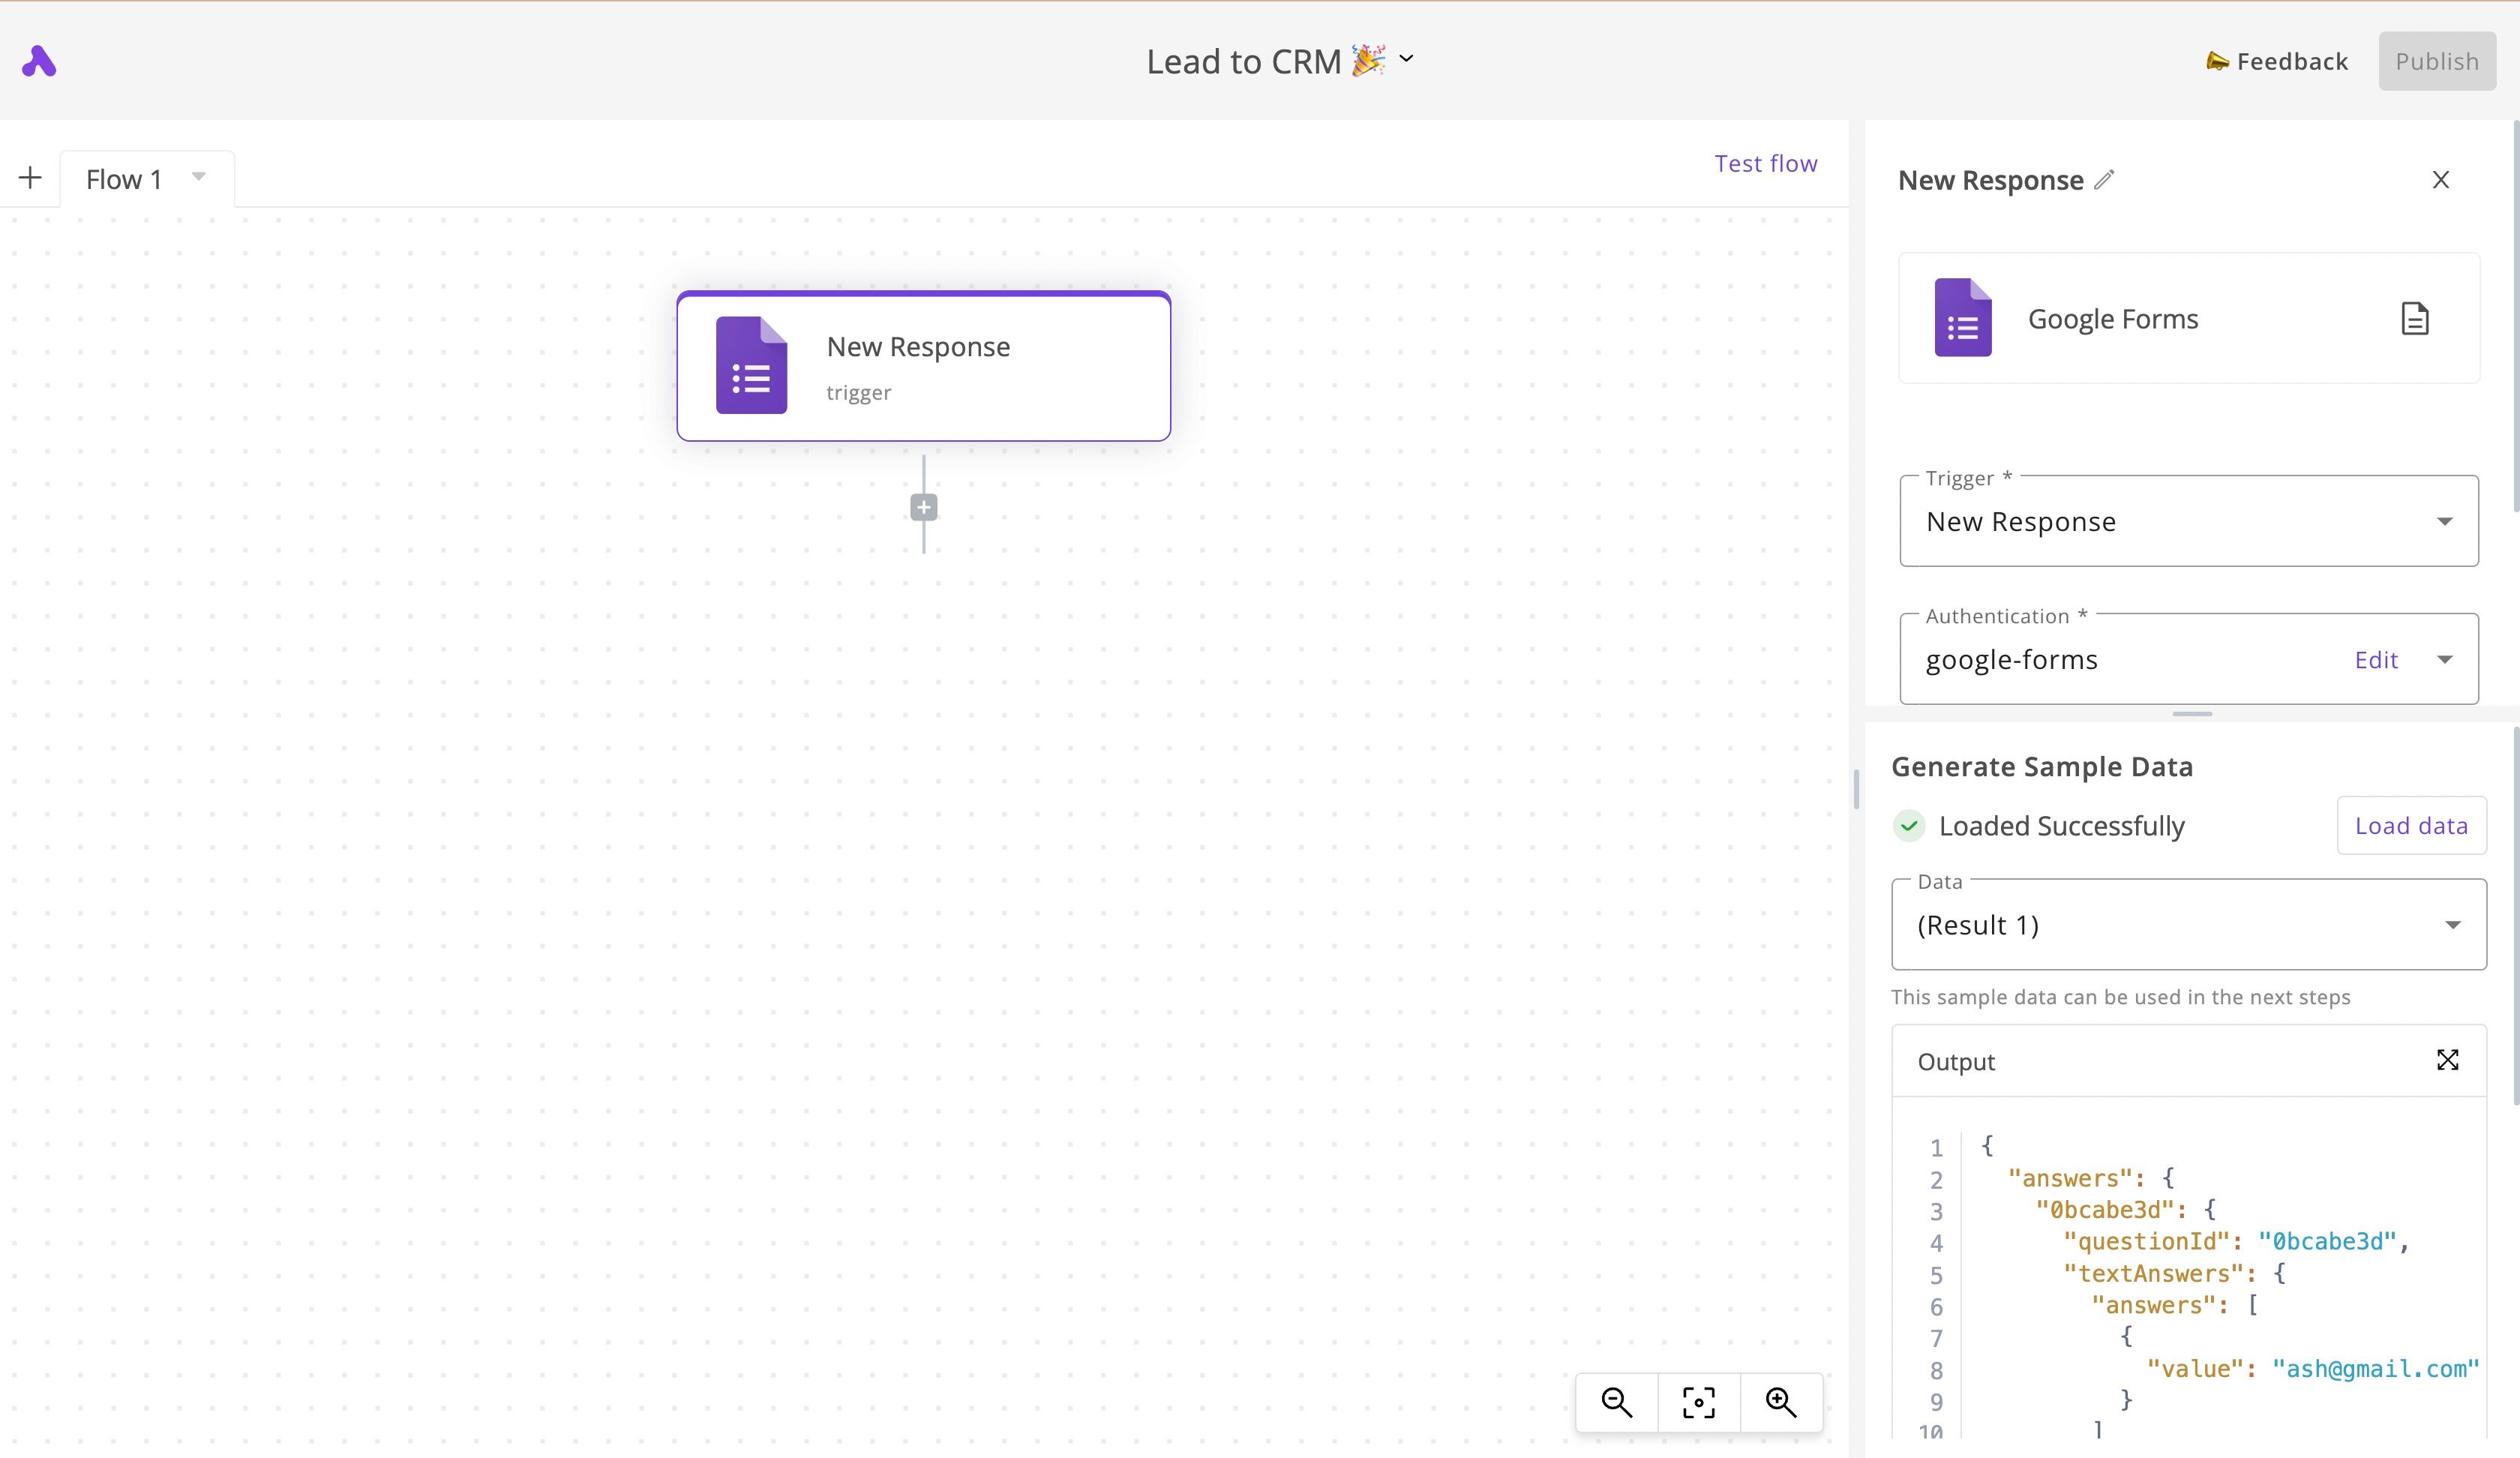
We'll pass data from this step to the next one to build our automation, click on Load Data to get some data from your form to use it in the next steps. When I clicked on it and because I have some data in my form, I got this result:
4. Check lead score with a conditional step
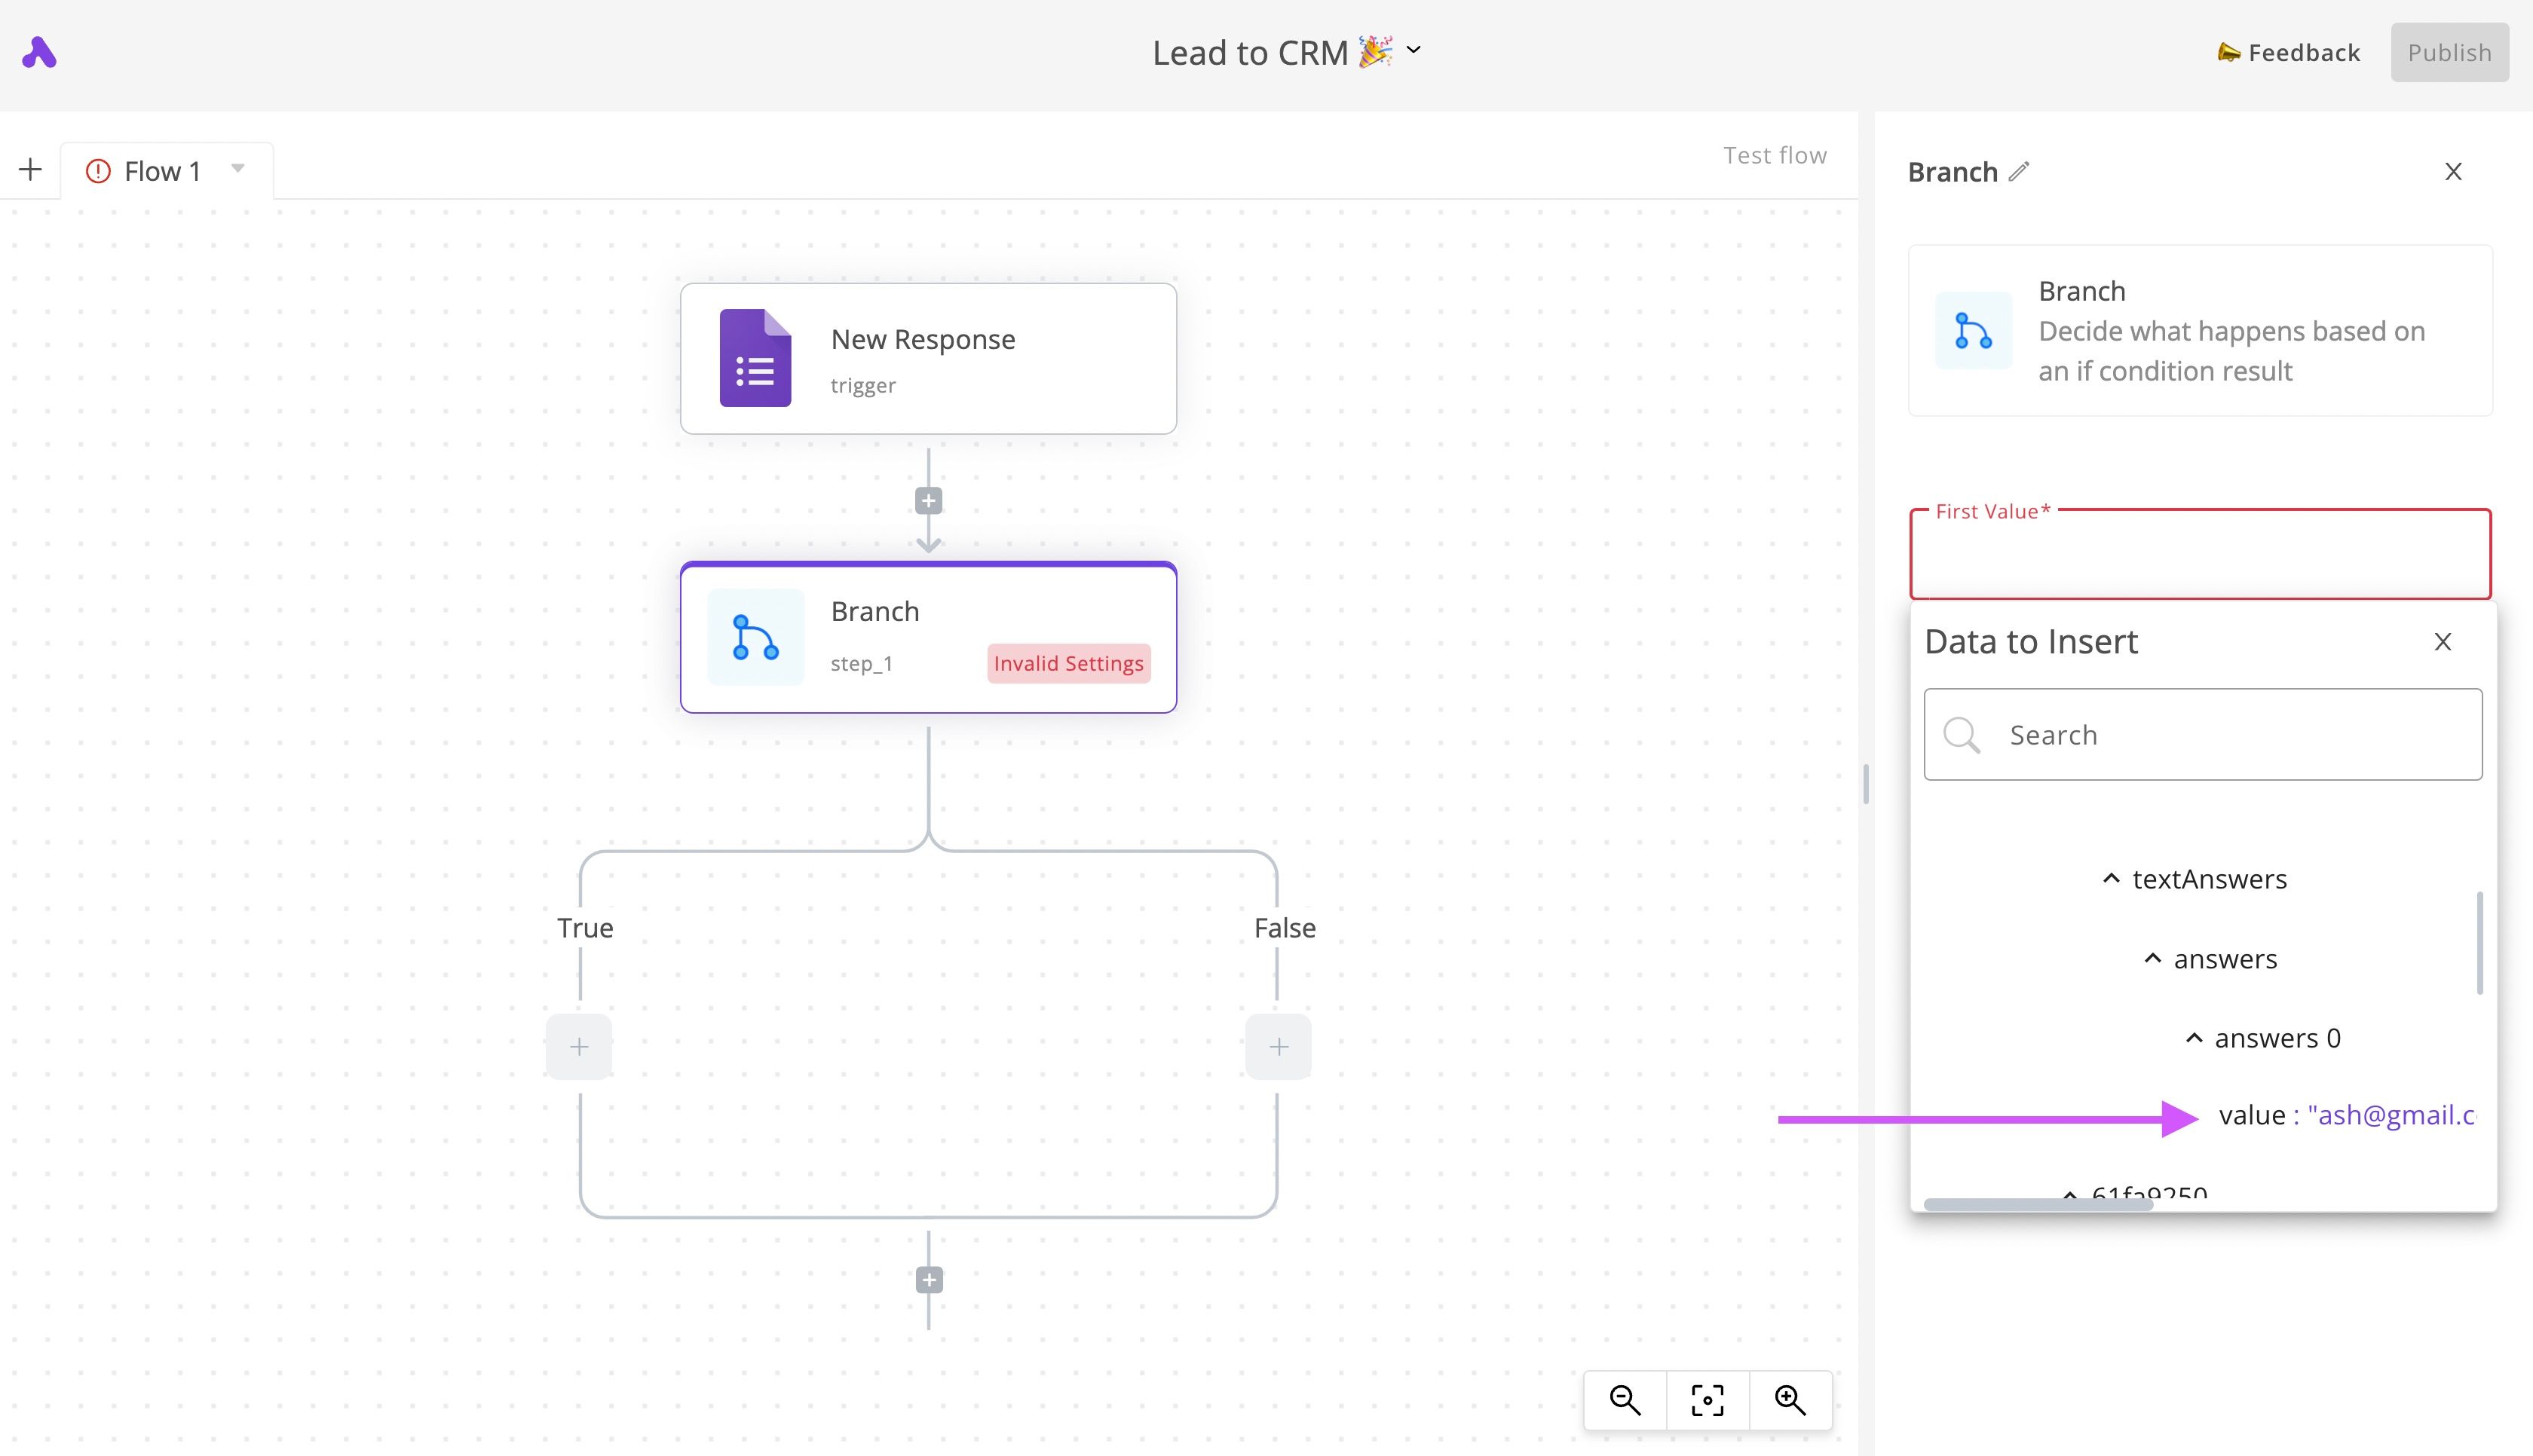
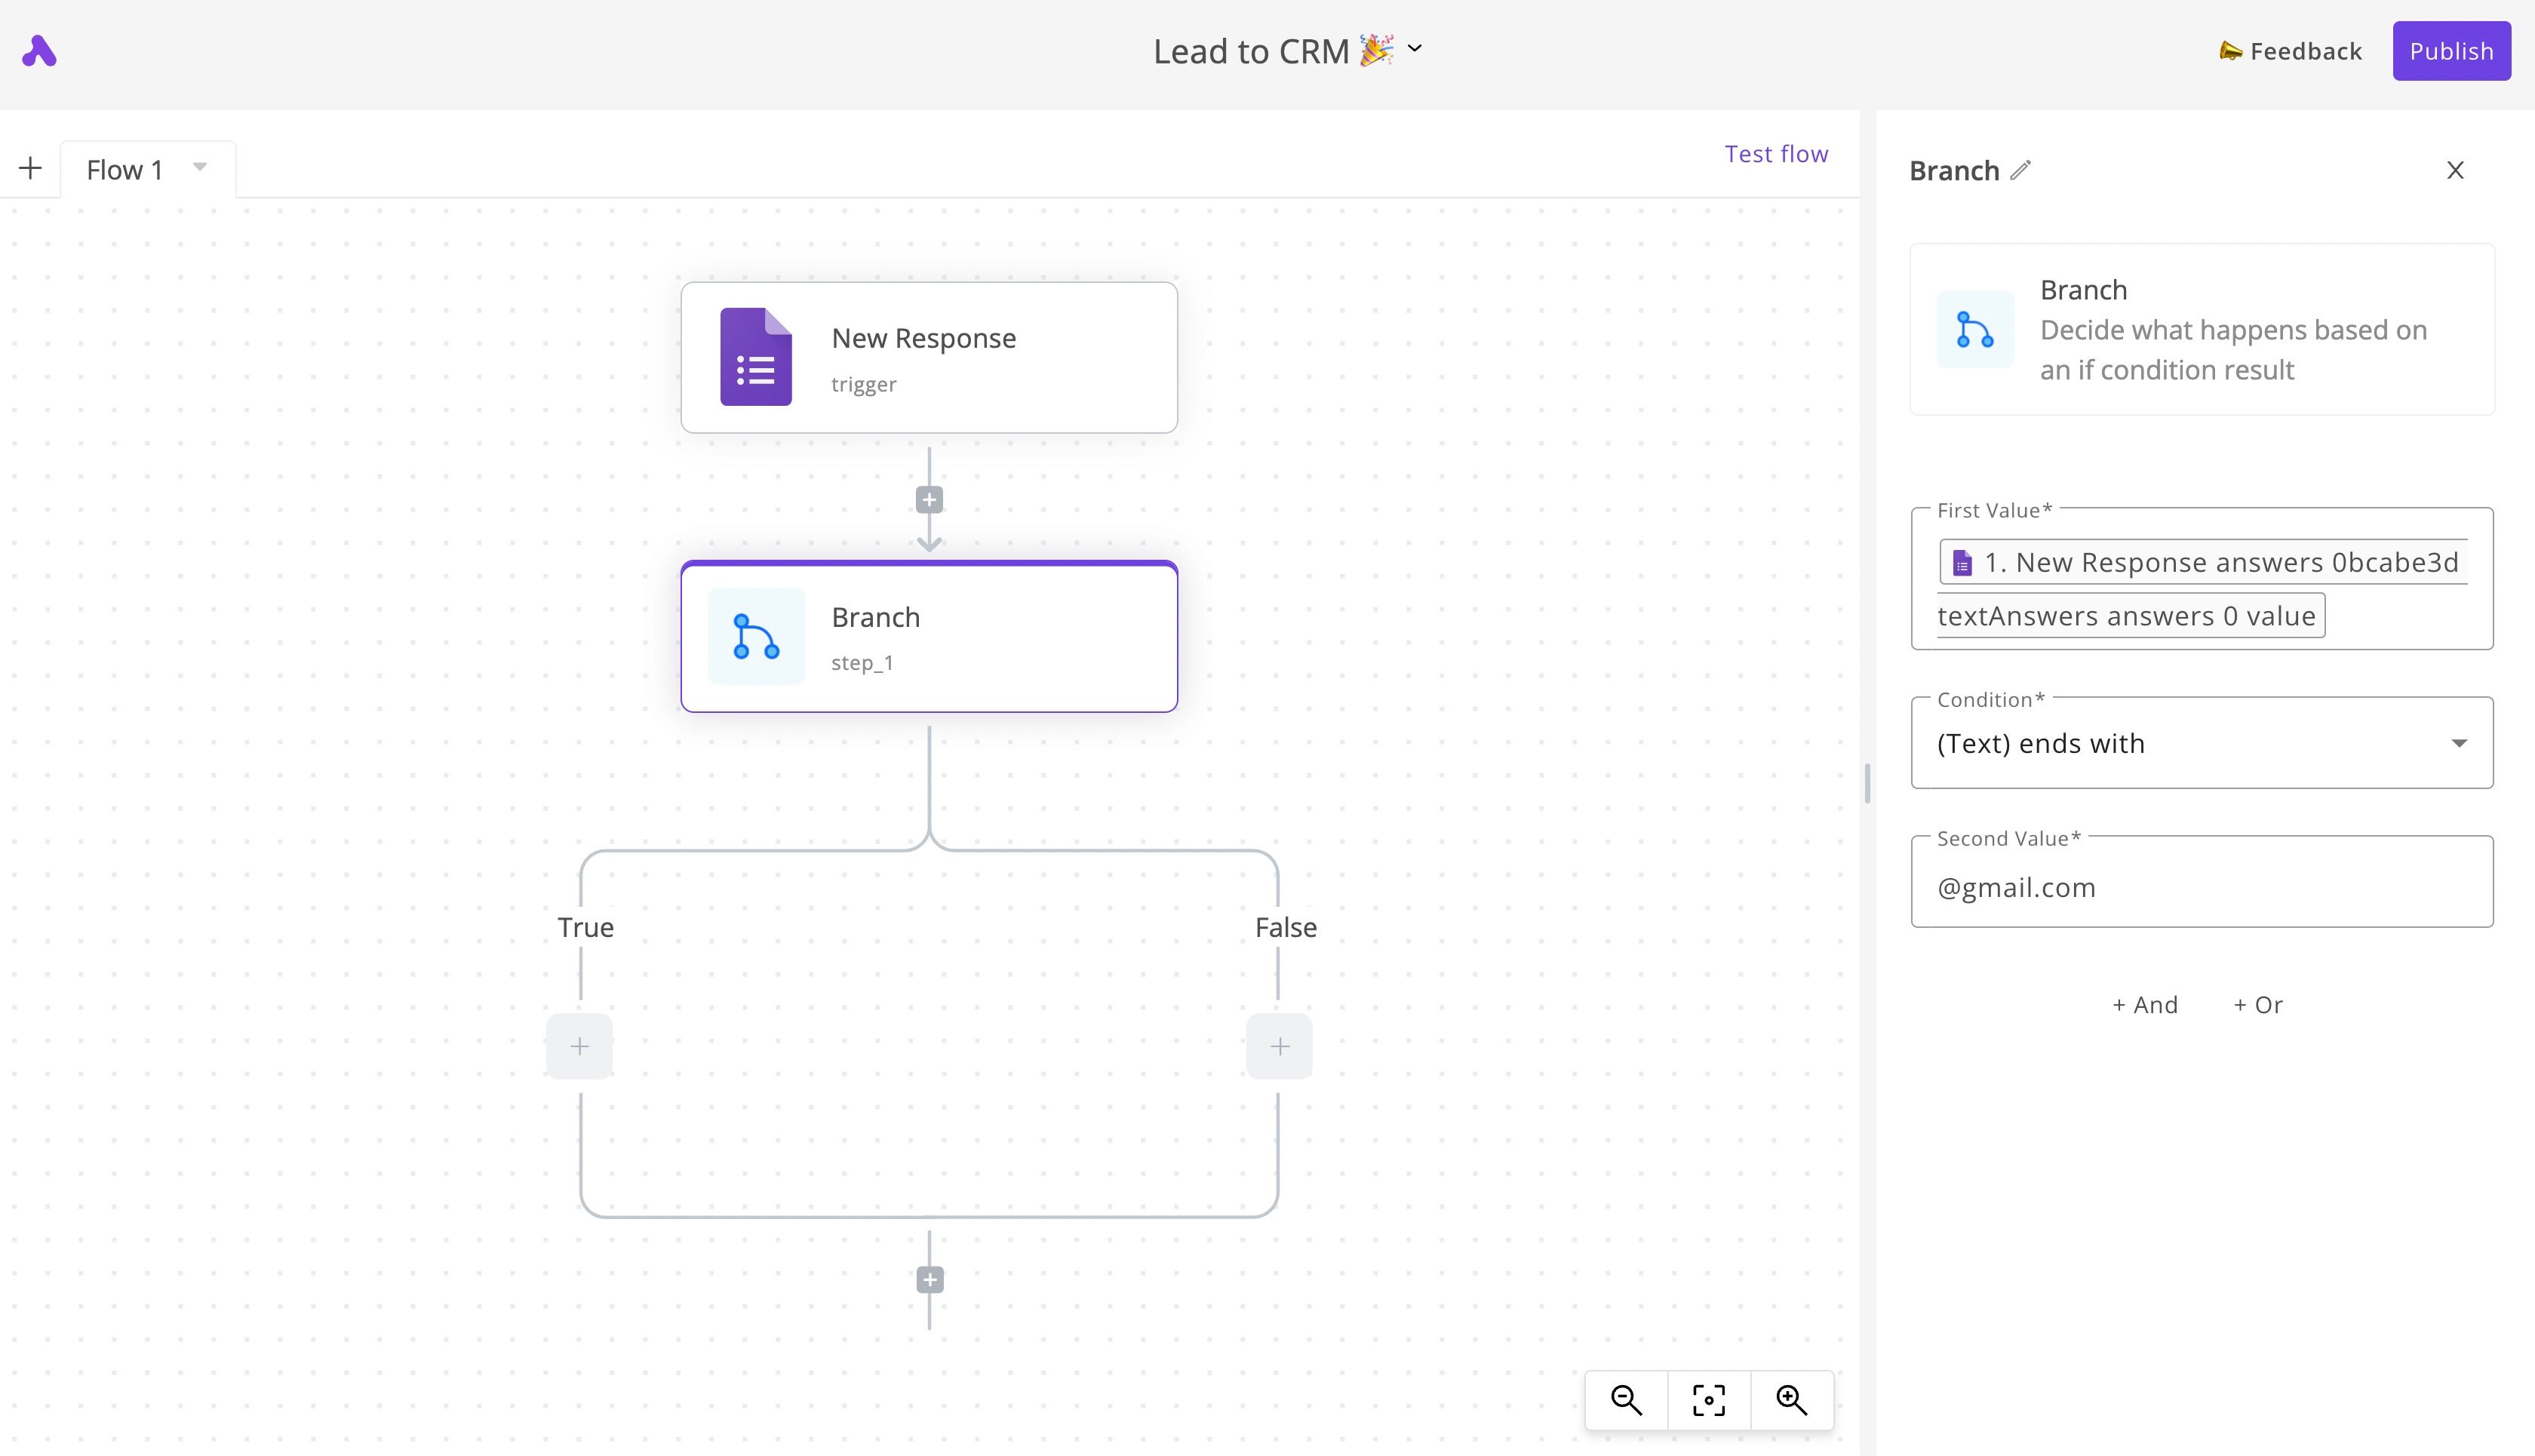
We'll now classify the received lead to decide on the next step. Our simple criteria is whether the lead has a Gmail address or not. So we'll add a Branch step, the first value should come from the form step. Find the attribute that holds the email address as you see in this screen:
Condition will be (Text) Ends with and the second value will simply be @gmail.com. When you set these up, your step will look like this:
5. Save contact to a MailChimp audience
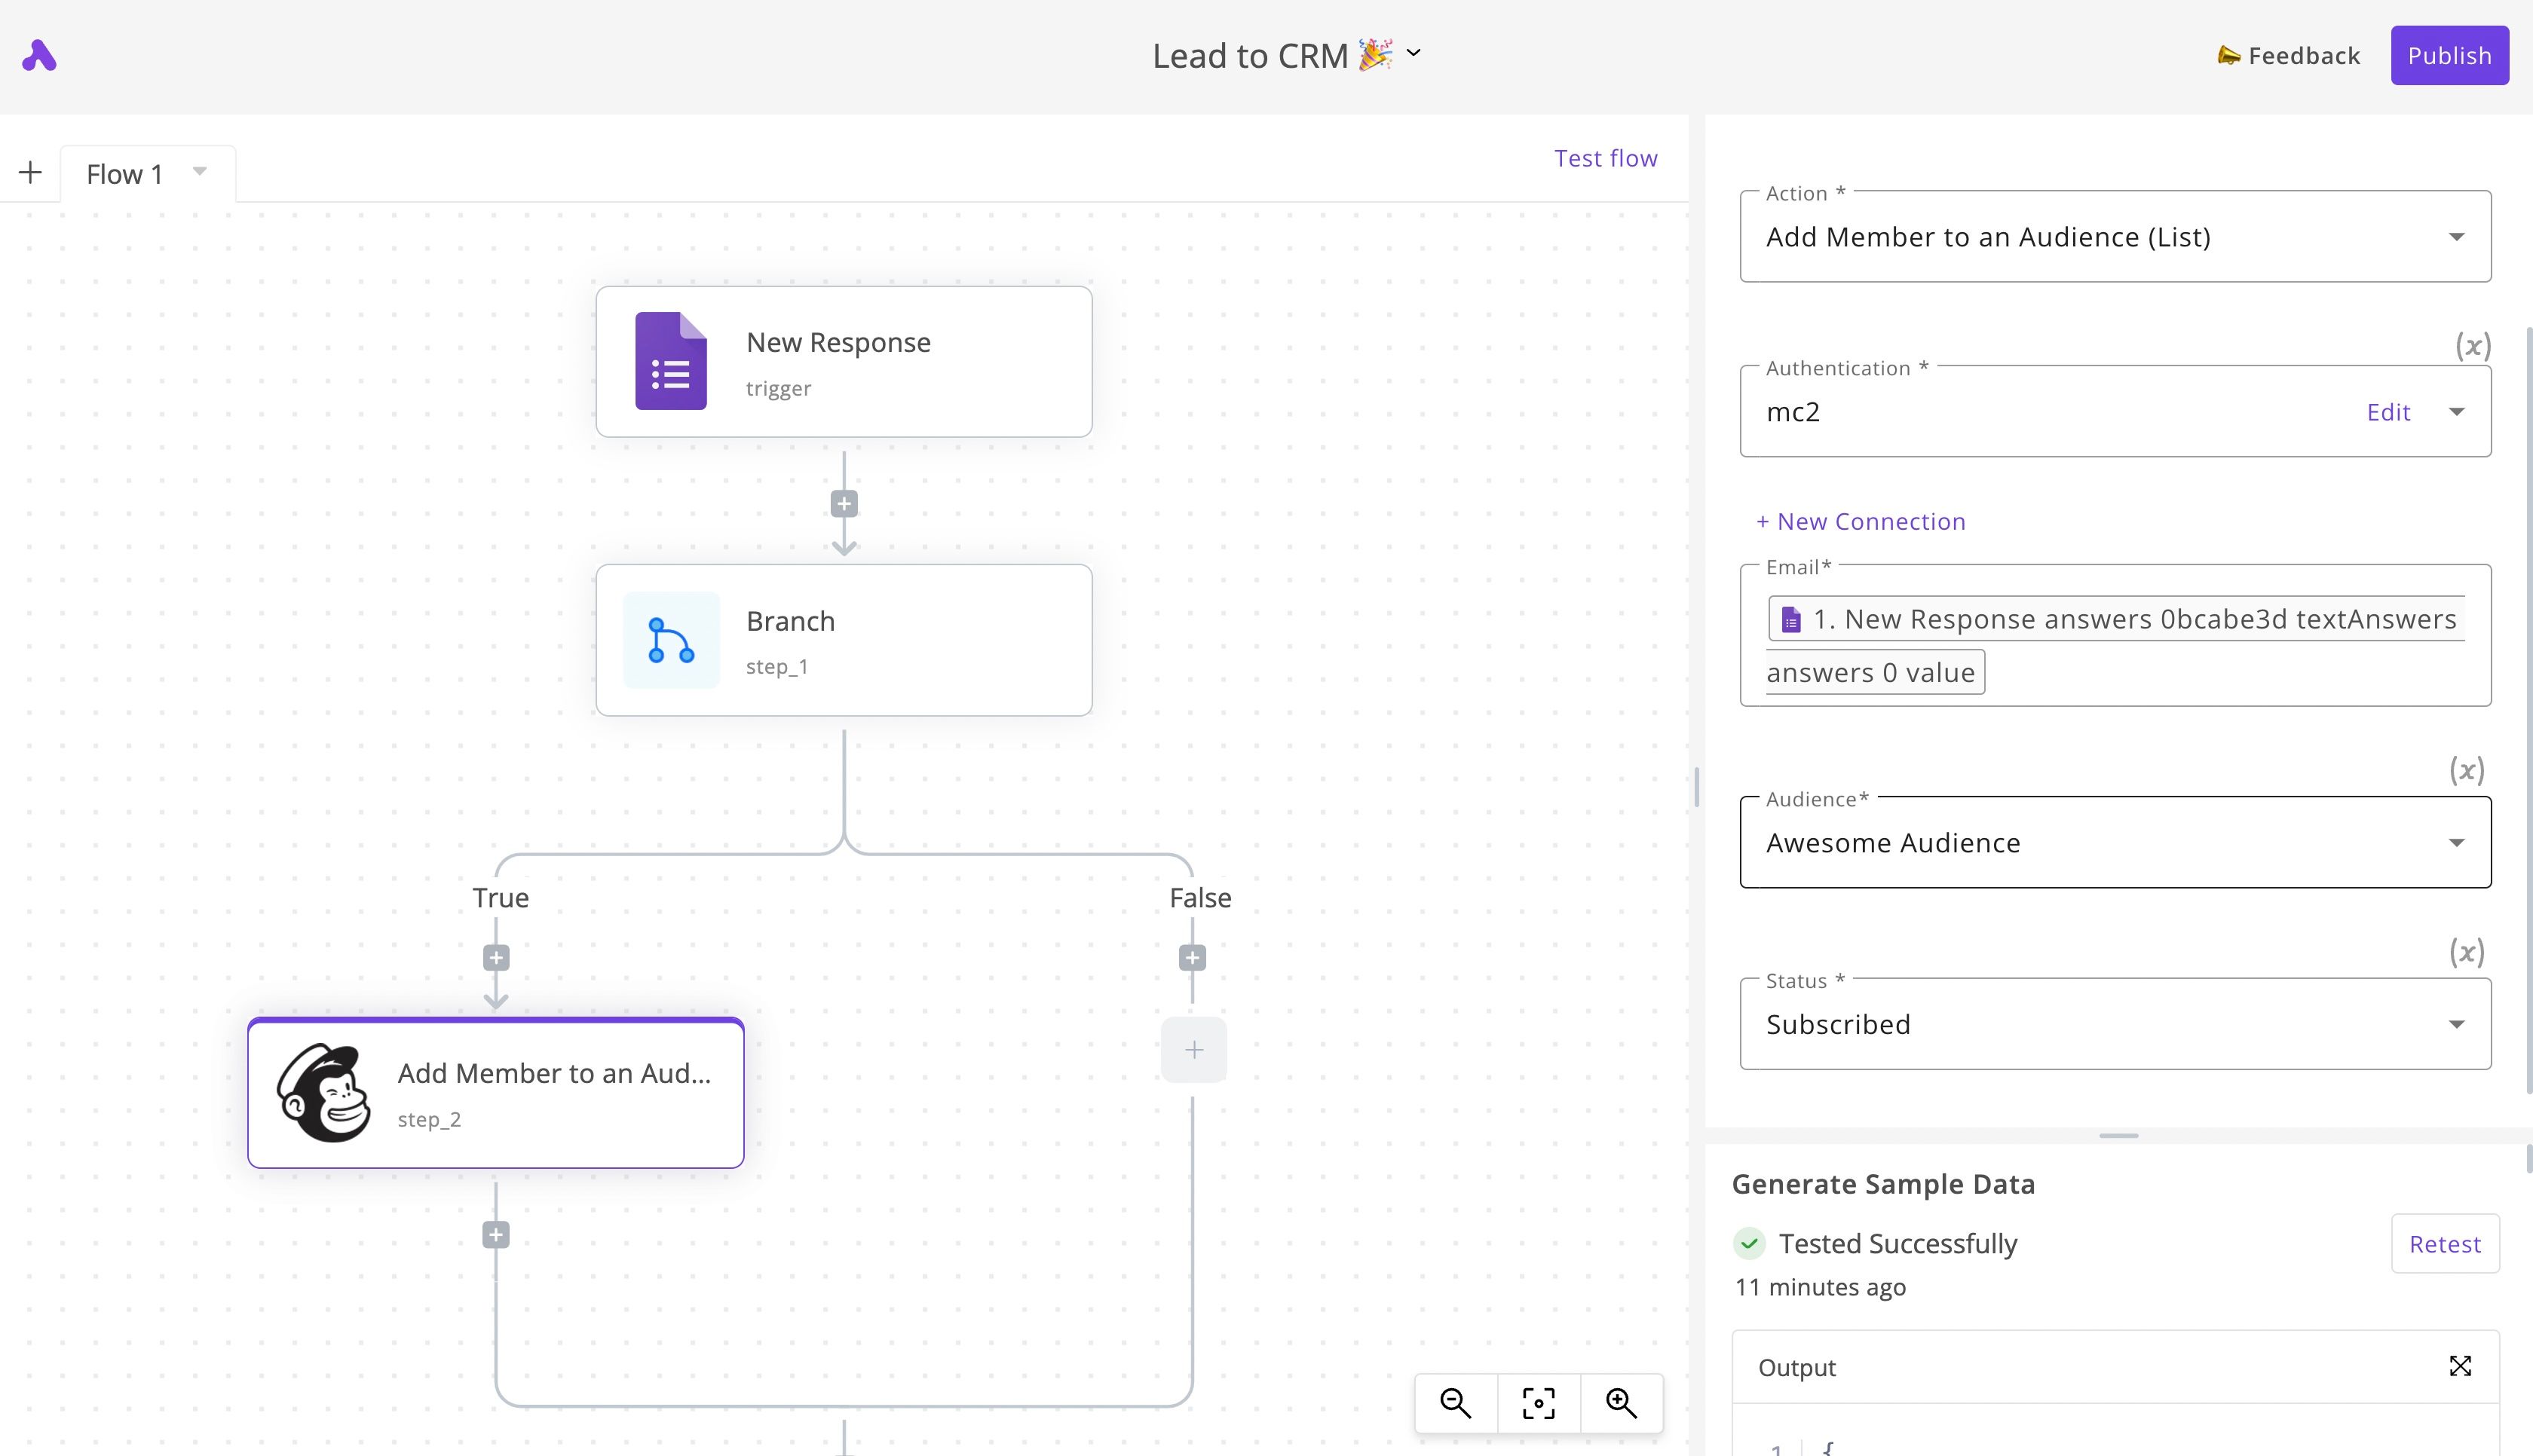
If the contact is just a Gmail address, the True branch will run. So we'll add a step under True that adds the contact to a MailChimp audience instead of adding it to the HubSpot CRM.
Click on the + under True. Choose MailChimp from the list of pieces to the right and choose the Add Member to an Audience action. Connect your MailChimp account using the + New Connection button, then select the email from the form step in the Email field. You'll select the same attribute you selected in the Branch step. Then choose the Audience you'll add the contact to, and set the Status to Subscribed.
If you'd like to ensure the step is working, click on "Test Step" in the panel below the settings and look for a successful test. When I set up my MailChimp step, the screen looked like this:
6. Save your lead in HubSpot CRM
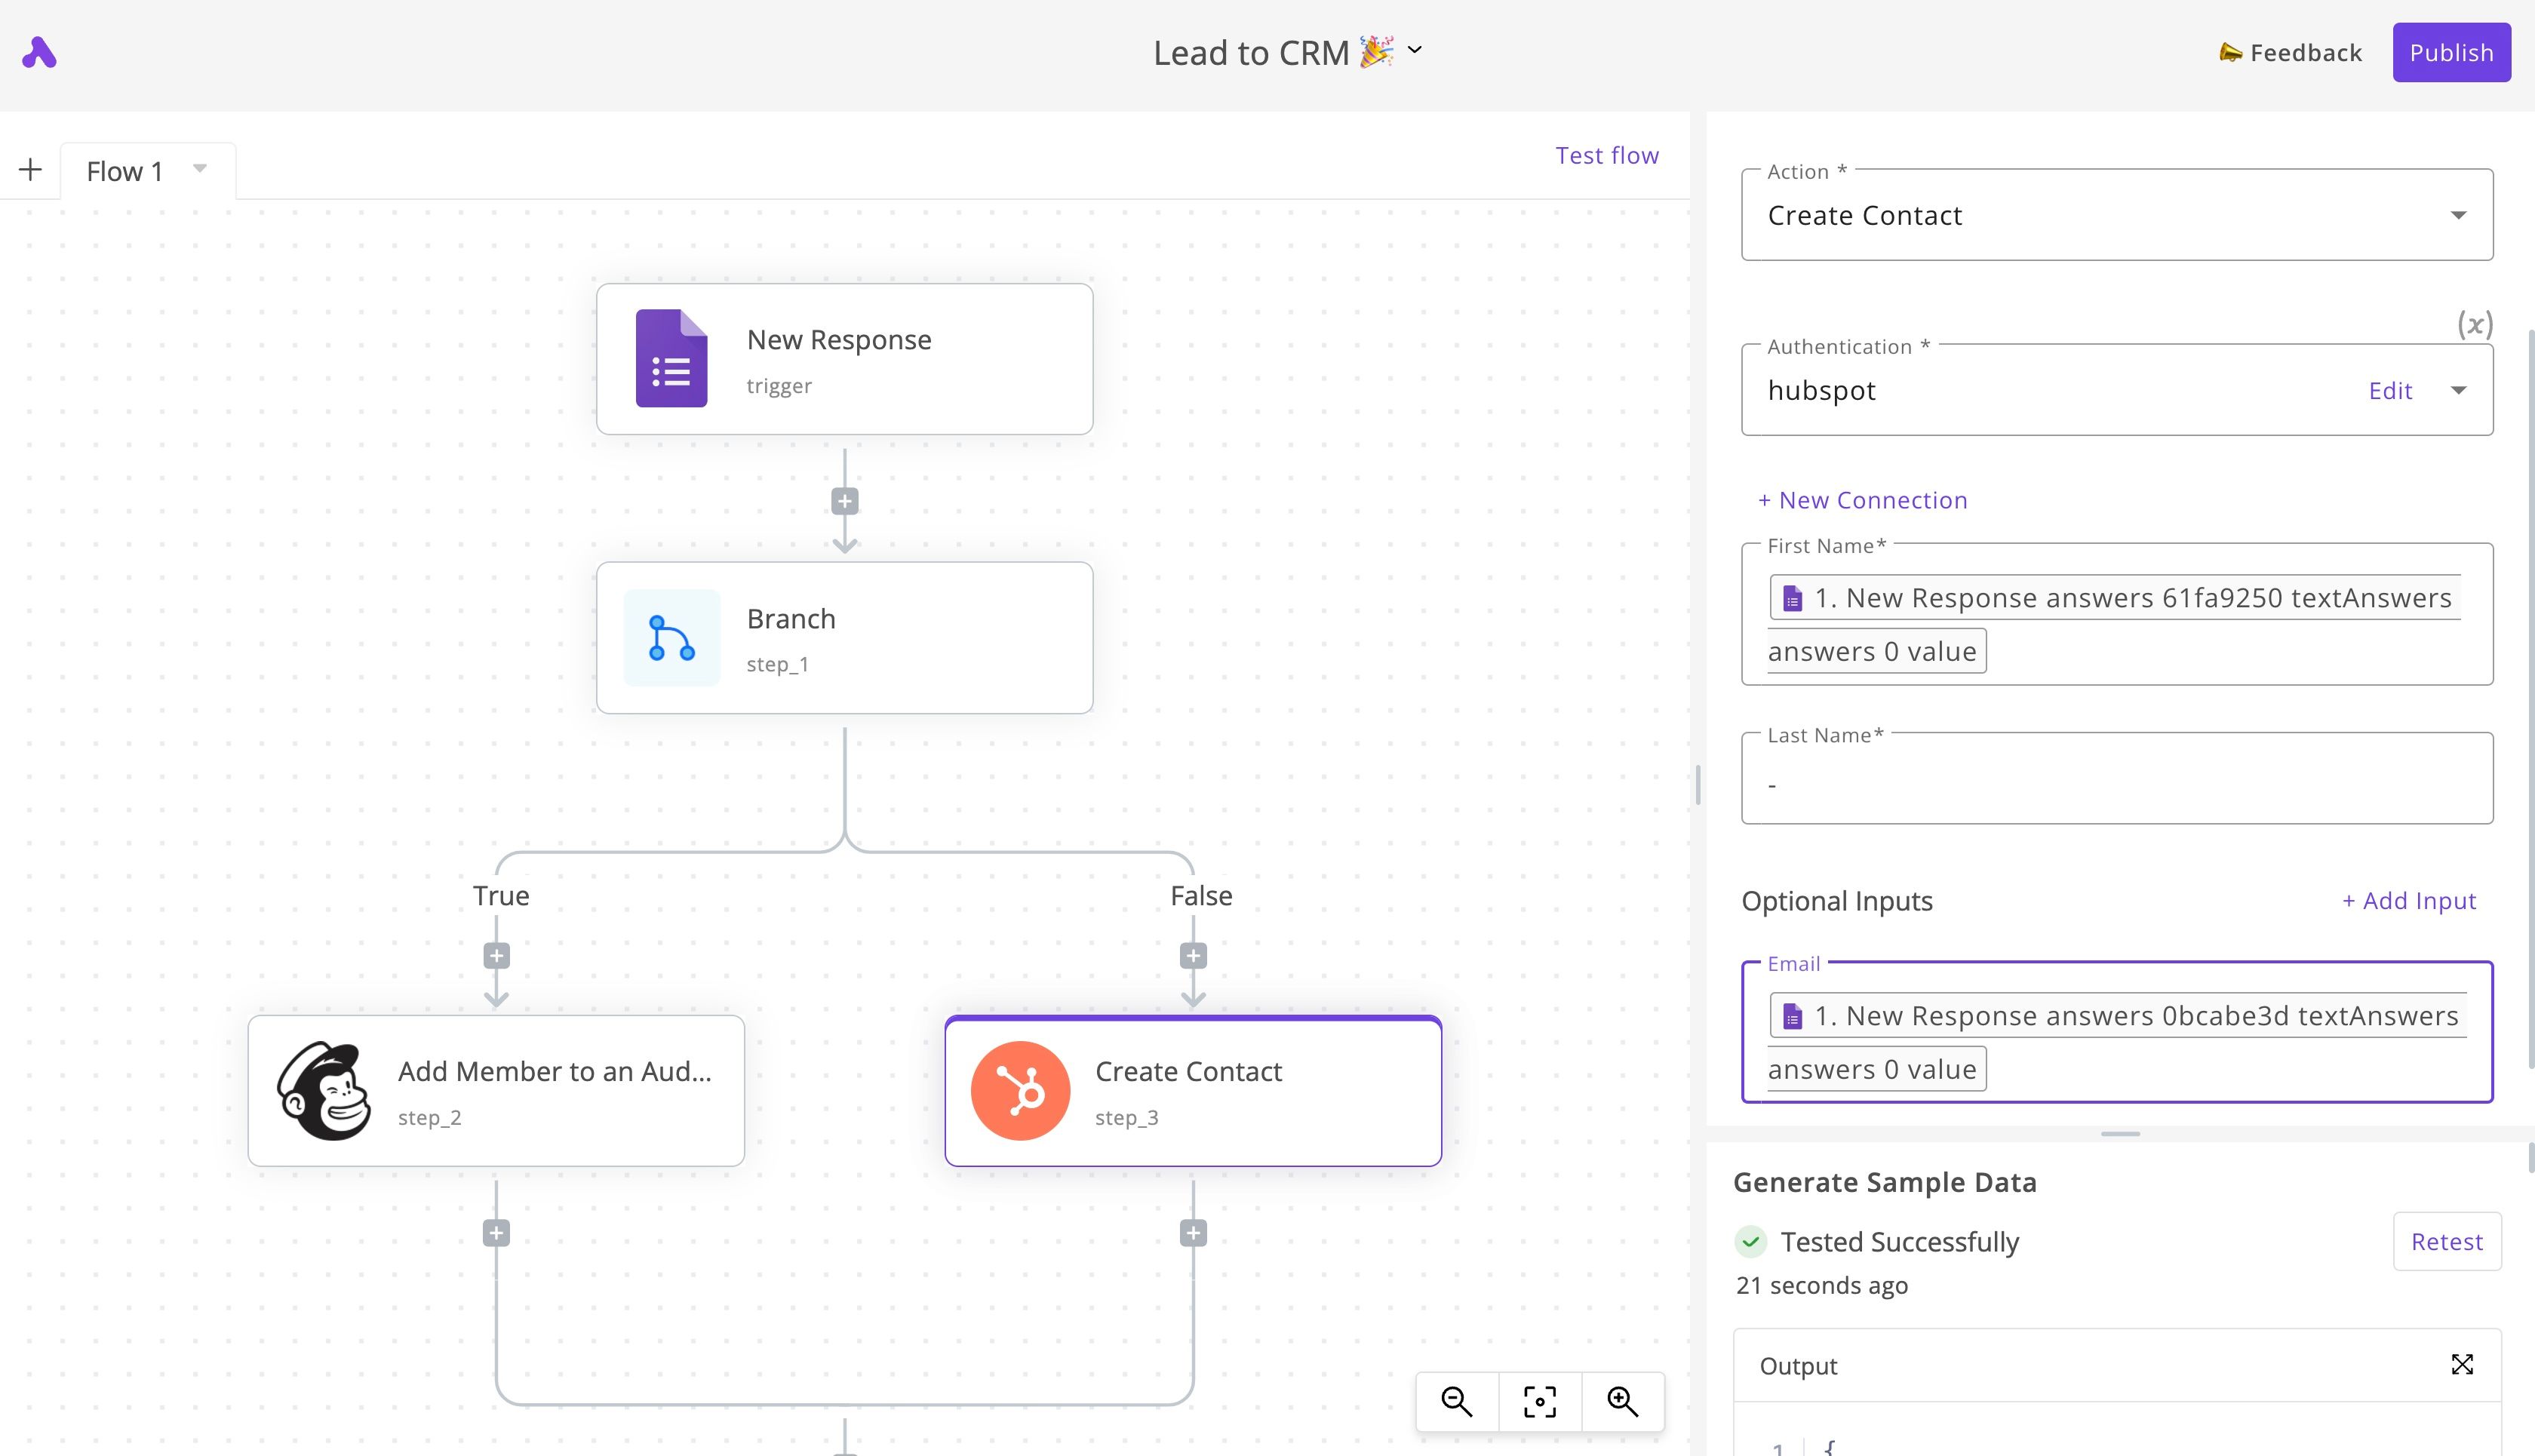
Now add a new step under False, choose the HubSpot app and the Create Contact action. Fill in the First Name and Last Name using the dropdown, choose values from the Google Form step. You can also add an optional Email field and fill it with the contact's email like you did in the MailChimp step.
I filled all the settings and tested the step and it worked. My overall screen looked this way:
7. Send an email notification about the lead
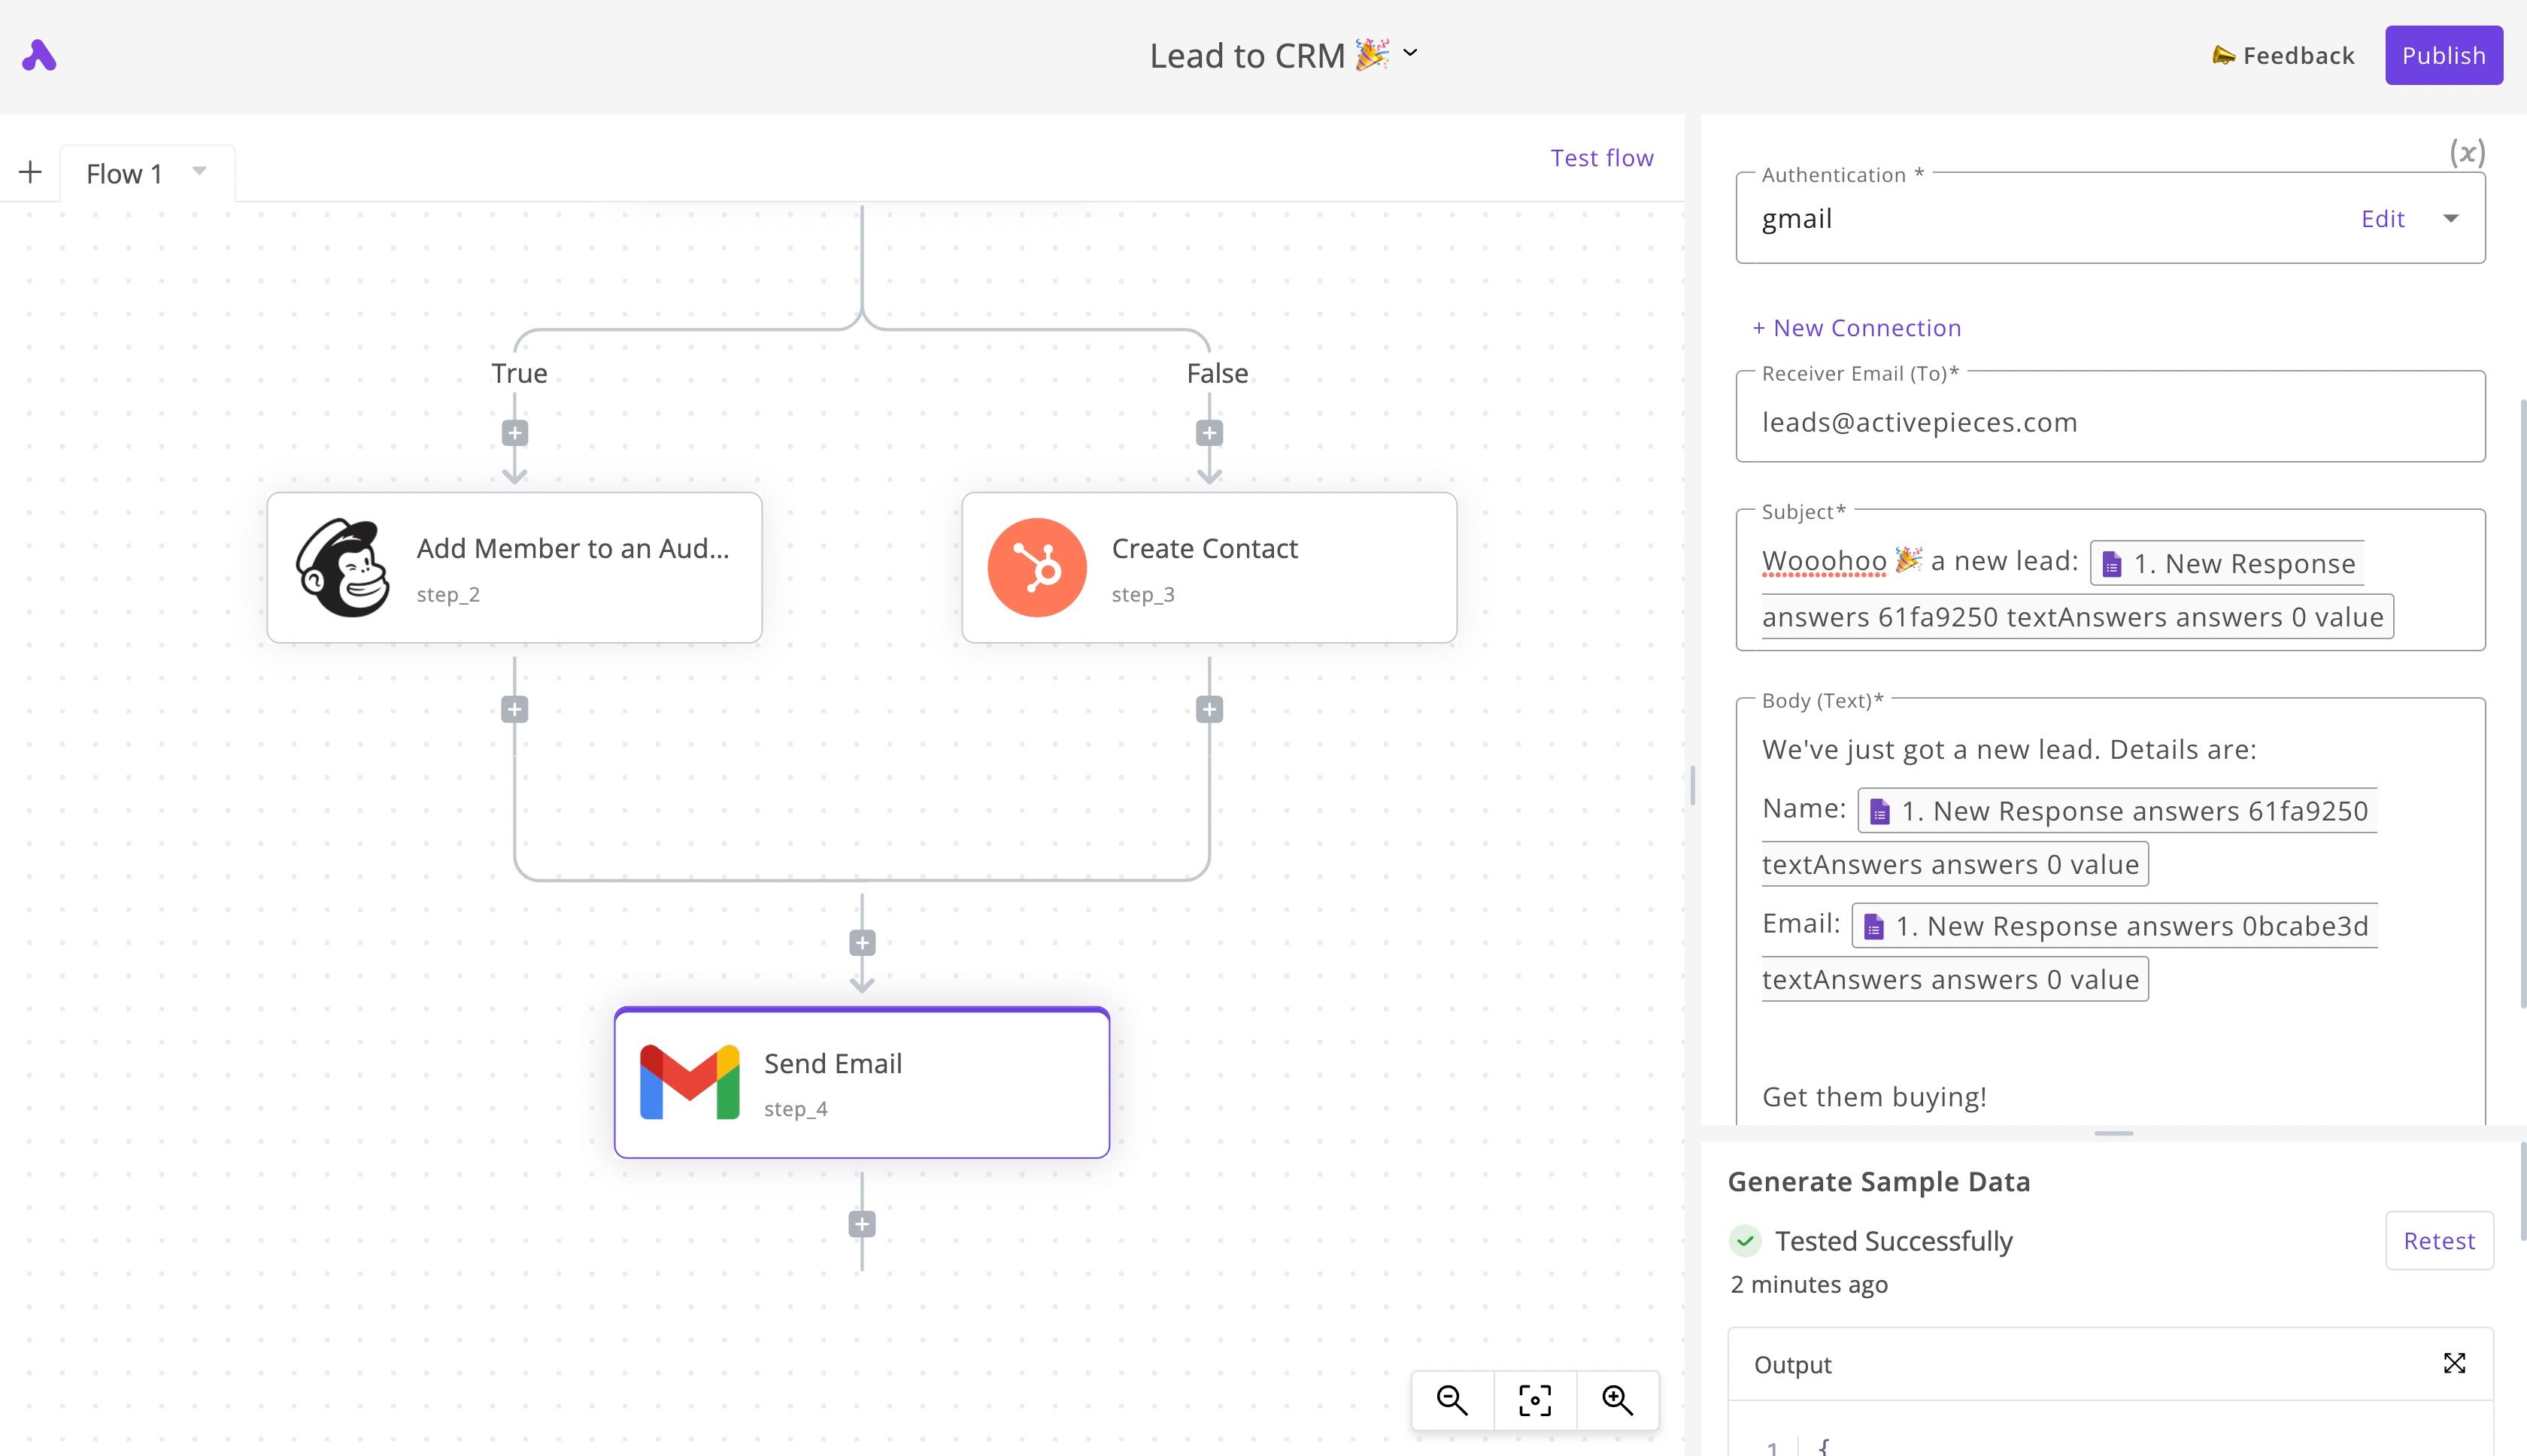
When the branches meet, click on the + button. This will add a step that runs regardless of the result of the condition, because we'd like to get an email notification about all the leads.
Add a Gmail step there and select the Send Email action. Fill in the email address you'd like to get your leads notifications to, and construct the email as you like and test the step. I did it like this:
When I tested the step, I received this email:

8. Test and publish your lead flow automation
It's time to test out the whole flow. Click on Test flow to the top right corner and once all the steps run and succeed, you're ready to click Publish and your flow will get activated — congrats 😃
9. Start receiving leads right into HubSpot, MailChimp and email
You're ready to use this in production. Send your link in your email campaigns or add it to your landing page and the collected leads will start flowing into your existing tools: HubSpot CRM and MailChimp, and you'll get notified in your email.
More lead flow automation ideas
If this is not enough for you, here are some thoughts on what you can change about this flow:
- Set a different lead scoring criteria: You don't have to branch out on the email address of the collected lead, you can use your prequalification criteria. Country? Revenue? Or any other detail of the submitted lead.
- Use Typeform for a better experience: You can rely on Typeform instead of Google Forms if your audience is used to cooler interfaces, Google Form is powerful but pretty classic.
- Use another CRM: You don't have to use HubSpot as your CRM. If you use Pipedrive or Salesforce you will still be able to automate this lead flow too.


